Unboxing

TRIAL INFORMATION
If you are undertaking a trial, you will need to retain the original box you received your product in, the inner packaging and correctly re-box your product.
Ensure that all components of the product have been thoroughly cleaned and free of any contaminants before returning at the end of your trial period.
How to Use
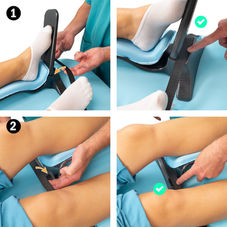
Inserting the Foot Plate /Leg Pad Placement
Push the Foot Plate firmly into the Foot Plate Slot at the correct orientation, depending on the procedural and access requirements.
Push the Foot Plate firmly down to ensure complete engagement.
The Leg Pad needs to be placed centrally on the Lower Leg Support, ensuring no hard edges are exposed.
The vertical heel protection on the pad should overlap the Foot Plate.

Buckle Orientation
Ensure that the Table Strap Buckle is sitting on the opposite side to the leg that you are working on.
If you are working on the left leg, the Table Strap Buckle sits on the right side of the mattress so that it can be tightened from the right side of the table. If you are working on the right leg, the Table Strap Buckle sits on the left side of the mattress so that it can be tightened from the left side of the table.

Positioning the Patient and Lower Leg Support
Place the patient on the imaging table in a suitable orientation for antegrade approach. Once the patient has been correctly positioned, place the Lower Leg Support onto the table.
Lift the patient’s leg onto the device, positioning it so that the ball of the foot can rest firmly against the Foot Plate. You may need to move the leg support up or down the table slightly to achieve this.

Placing the Straps over the Lower Leg Support
Once the patient and Lower Leg Support have been positioned, lift the Table Straps onto the Strap Surfaces at either end of the Leg Support. It may be necessary to slide the Table Straps up or down the table slightly.

Applying Leg Straps
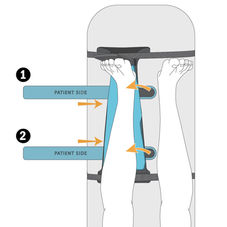
Begin with placing the two Leg Straps around the patient’s leg, placing one strap closer to the ankle and the other closer to the knee.
The patient contact side of the straps are labelled ‘Patient Side’ to ensure the rough hook-side of the fastener does not come into contact with the skin. This label should be facing up when threading the strap underneath the leg support. Hold the hook-side of the fastener over the shin then pull the loop-side down onto the hook-side to secure the leg.
Additional straps can be used if required.

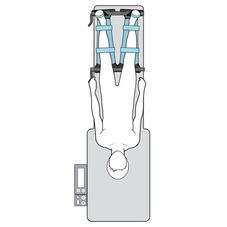
Dual Lower Leg Support Placement
Two Lower Leg Supports can be placed side by side on the lab table if both legs require immobilisation. When placing the Table Straps, lift the single Strap onto the Strap Surfaces across both units. Tighten to ensure adequate tension.
*For dual placement, ensure table width is 16” or 406mm minimum width for product stability.

Reboxing


